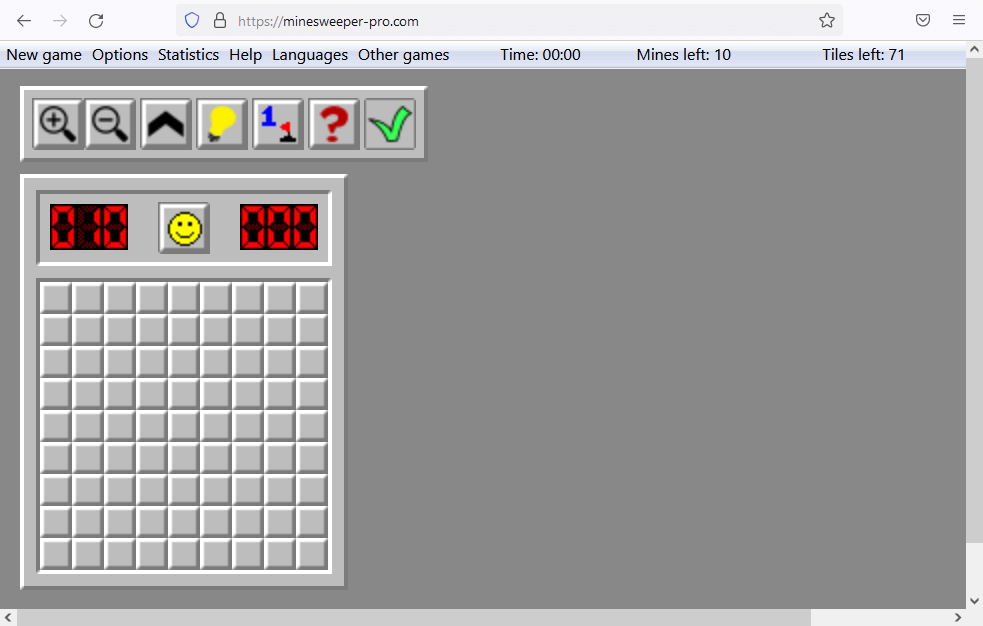
You look at a mysterious board full of little squares and digits, and you wonder: what is this game about? What should I do? How to play? This article will answer these questions and explain everything in detail.
You first need to know that to start the game, you must click anywhere on the game board with the left mouse button. Then, based on the numbers you see, you have to figure out where the mines are and secure them with flags, and discover more numbers to find even more mines. With that little introduction in mind, let us show you in practice how to beat a Minesweeper game.
Tutorial: how to play Minesweeper?
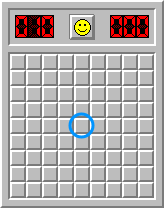
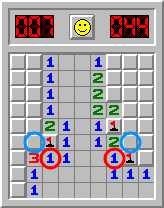
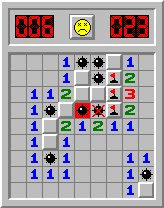
Here is how a typical Minesweeper game starts: a board with many squares. We call these squares “fields.” Initially, each field has a cover. We can uncover a field by left-clicking on it. If the uncovered field hides a mine, the mine blows up, and we lose. Fortunately, the first field we uncover never hides a mine. For your first move, you can choose any field you like. This time we will select the field in the middle: we start this game by left-clicking on the field marked with a blue circle.
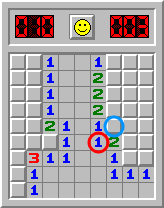
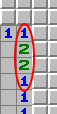
The first move opened up a large area. We see a lot of empty fields right in the middle of the board and two patches of covered fields surrounded by numbers: one patch on the left and one on the right. Thanks to these numbers, we can deduce which covered fields contain mines. For example, let us consider the field marked with a red circle. It has 1 in it, which means that there is precisely one mine somewhere around it. There are eight fields around it in total. Seven of them have already been uncovered: the three on the left are empty, as is the one below. The field to the right has 2 in it, and two fields have 1s: one above and one at the bottom-right corner of our red-circled 1. Since these fields are uncovered, they cannot contain mines. The only field still covered is the one to the upper right, marked with a blue circle. There is only one mine around the 1 in a red circle and one hideout for it: the field marked with a blue circle. Therefore, we can mark this field with a flag. We can do it by clicking on it with the right mouse button.

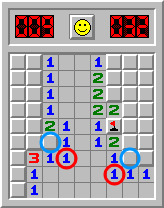
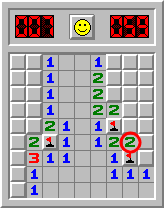
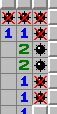
Now that our first mine has been found and our first flag has been placed, we can use these recent discoveries to find nearby fields which do not hide mines. Let us consider the field marked with a red circle. This field has 1 in it. Six uncovered fields touch it: three empty fields on the left, one 1 on the bottom, and two 2s: one on the top and one on the bottom right. Also, two covered fields touch the 1 with a red circle: one on the right, marked with a flag, and one on the upper right, marked with a blue circle. The reasoning is as follows: only one mine is adjacent to the field circled in red, and this mine has already been flagged to the right. Therefore, the remaining surrounding fields cannot contain mines. The only remaining covered field is the field with a blue circle. Since it cannot hold a mine, we can uncover it by left-clicking on it.
We can now repeat the move we made in step two. Take a look at the two fields with red circles. Both have 1s in them. Both have only one neighboring covered field, marked with a blue circle. Therefore, the two fields marked with blue circles must contain mines. Let us mark them with flags by right-clicking on them.
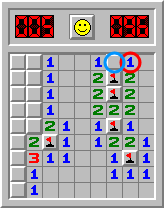
Again, after flagging some mines, we can look for fields that do not contain mines. Let us focus on the two marked with red circles. Like before, each field has a 1, and each already has a flag in the neighboring area. Moreover, each has precisely one covered field in its area that has not been flagged yet. These covered fields are marked with blue circles. Since no more mines can touch the 1s with red circles, the fields with blue circles cannot contain mines. We can thus left-click on both of them to uncover them.
In the previous step, we uncovered new numbers. One of these numbers is the 2 marked with a red circle. This 2 already has two mines around it: one below and one to the upper left. Therefore, there cannot be any more mines around this 2. All remaining surrounding covered fields can be safely uncovered. There are four such fields: three to the right and one above the encircled 2. We can left-click on all four of them to open them.

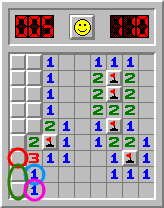
One of the fields we uncovered in the previous step was empty. The game automatically opened up a larger area of empty fields and some fields with numbers. We can now focus on the field with the number 2, marked with a red circle. Because it is a 2, exactly two mines must touch it. And there are precisely two neighboring covered fields marked with a blue ellipse. These two covered fields must contain mines, so we can place flags on them using the right mouse button.
This is the step in which we finally deal with the right side of the board. We notice that already one mine touches the 1 marked with a red circle – we marked this mine with a flag in the previous step. Hence, there can be no more mines near this 1, including in the covered field marked with a blue circle. We can left-click on this field to uncover it.
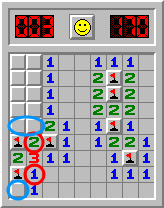
The left side of the board is much trickier than the right side. There are no more obvious moves in which a digit like 1 or 2 is exactly matched by the surrounding covered fields. This time we have to do some serious thinking. Let us consider the 1 in a purple circle. There must be precisely one mine next to it. Two covered fields are next to it, marked with a green ellipse. Hence, we know that there must be exactly one mine inside the green ellipse, but we need to know which of the two fields actually hides the mine. Now let us consider the 1 in a blue circle. We already know that there is a mine inside a green ellipse. The ellipse is entirely in the vicinity of the 1 with a blue circle, which means that other covered fields around the blue-circled 1 cannot contain a mine. In this case, the field marked with a red circle cannot hold a mine. Why? Because if it does, then the blue-circled 1 has two neighboring mines: one in a red circle and another in a green ellipse. Since the green ellipse undoubtedly contains a mine, the red circle cannot. Because of that, we can click on the field marked with a red circle to uncover it.
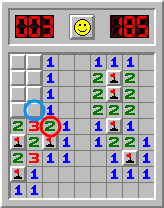
Now things are much more manageable. We can quickly determine that the two fields marked with green circles must contain mines. Why? First, because of the 2 circled in blue. Only two covered fields touch this 2, so these fields must contain mines. Secondly, because of the 3 in a red circle. This 3 already has a neighboring flagged mine. It also has two adjacent covered fields, which must hide the remaining two mines. Hence, we can put flags on the two fields marked with green.
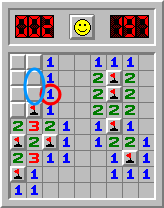
In this step, we see two fields with numbers that already have enough flags around them. Let us look at the 1 and the 2, each circled in red. All covered fields that touch these two cannot contain mines, so we can uncover them safely. Therefore, let us left-click on all fields marked with blue.
This time we go back to mine searching. Let us focus on the field with a red circle. There should be two mines around it. One below it has already been found and flagged. The other must be in the only remaining covered field marked with a blue circle. Let us click on this field with the right mouse button.
Now let us consider the 1 marked with a red circle. It already has a neighboring mine, so the other covered fields next to it – the ones marked with a blue ellipse – can be safely uncovered.
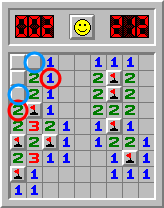
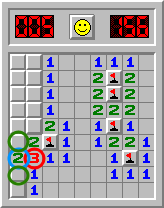
Take a look at the counter in the top-left of the game board. Currently, it says “002,” which means that two mines are remaining to be found on the board. In this step, we are going to find them. Let us consider the 1 and the 2 in red circles. Both touch only one covered field, and both indicate that there must be one more mine near them. Hence, the remaining two mines must be hidden in the fields marked with blue circles.
All mines have been marked with flags, but the game has yet to be won. This is because the condition for winning the game is to uncover all fields that do not contain mines. In fact, you don’t have to use flags if you can remember where the mines are. But this is a challenge for more advanced players. In this tutorial, we use flags, and to win, we need to left-click on the two remaining covered fields, marked with a blue ellipse.
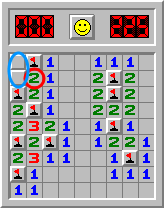
Look at the picture of the happy yellow face in the sunglasses at the top of the gameboard. It indicates that the game is over and you have won. Now, look at the counter in the top-right corner of the game board. It shows the elapsed time. “231” means that it took us 231 seconds to finish the game. This is not a particularly good result, but this is a tutorial for beginners, so there is nothing to worry about.
If you prefer, you can also watch a video tutorial on YouTube:
Patterns
You have already learned the basics. You know how to find mines and places where there are no mines. But all this logical thinking takes so long! Of course, the more you practice, the quicker you are. But is there a way to play really quickly?
Yes. When you play long enough, you notice that specific patterns of numbers indicate where mines are and where they cannot be. With practice, you learn these patterns by heart, and you can recognize them quicker and quicker. Eventually, there is no logical thinking involved. You see some numbers, and you immediately know where the mines are. Let us look at the most straightforward example: the “1 in a corner.”
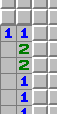
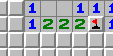
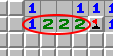
1 in a corner is an “obvious” pattern we used earlier in the tutorial. Look at the first picture above and try to identify all 1s that have only one covered field around them. They are marked with red circles in the second picture. These are the “1s in corners.” We already know a mine must be in the only available covered field next to each. The locations of these mines are marked with bombs in the third picture.
1 in a corner is an obvious pattern because you learn it very quickly. Soon after learning basic moves, you no longer do it step by step: look for 1, count all available covered fields and think whether the numbers match. You look at the board, and you immediately see all the 1s in corners, and you know that you should place flags next to them. This is how patterns work.
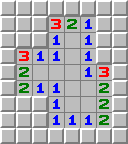
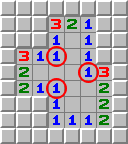
The most popular but less straightforward pattern is the 1-2-1 pattern. In this pattern, there is a 1, a 2, and a 1, in that specific order, next to each other. If you see such a setup, there are two mines next to the 1s, in the 2’s corners. Any flags already placed near these numbers affect the pattern and should be subtracted before you decide whether this really is the 1-2-1 pattern or not. Hence, sometimes you have a 1 and a 2 and a 1, which are not a 1-2-1 pattern, and very often, you have different numbers that constitute a 1-2-1 pattern. This doesn’t sound very easy, so let us consider a few examples.
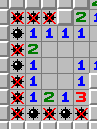
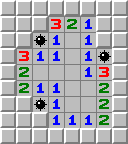
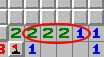
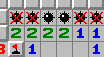
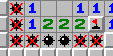
Let us consider a fragment of the board in the first picture. This is a fragment of the board right after the opening move. In this opening, we can see two 1-2-1 patterns, one oriented horizontally and one oriented vertically. These 1-2-1 patterns are marked with red ellipses in the second picture. An advanced player looks at this and immediately knows where the mines are: there is a mine in each of the 2’s covered corners, and no more mines are touching the 1-2-1 pattern. The locations of the mines are shown with bombs in the picture on the right. The squares where there are no mines display crossed-out bombs.


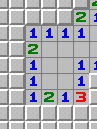
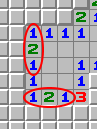
Sometimes the first click opens up an area with a configuration of numbers that frustrates beginner players. An example is shown above on the left. There are no 1s in corners, so it is not immediately apparent where the mines might be. At least to a beginner player. An advanced player immediately recognizes the 1-2-1 pattern, marked with a red ellipse in the second picture. With this pattern, there are always two mines located next to 1s or in the 2’s corners; no more mines touch this pattern. This is shown in the right-hand picture: the mine symbol shows the mines’ locations, and a crossed-out mine shows where the mines cannot be. The player can safely place flags at the former symbol’s locations and left-click on the fields marked with the latter.
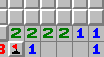
Here we have a 1-2-1 pattern even though the numbers are 2-2-2. This is because there are mines next to the two outer 2s. Whenever there is a flag adjacent to a number, we can subtract 1 from this number and think of it as if it had a new value and the mine did not exist. Here, instead of 2-2-2, the subtracting renders 1-2-1 and the mines above and below the pattern “do not exist.” As a result, an advanced player immediately knows that there are two mines: one to the upper 2’s right and the other to the lower 2’s right; all the other covered fields touching the pattern are mine-free. This is shown in the last picture: we can flag two mines (marked with bombs) and left-click on three other fields (marked with crossed-out bombs) because there are no mines there.
This is another example of a 1-2-1 pattern that emerges from different numbers after considering the existing flags. Here we have 2-2-1, but the flag above the first 2 reduces it to 1, so we have 1-2-1. This allows us to quickly find two mines and two mine-free places.


Here, the situation is even more complicated because two flags are touching a 3-3-1. After accounting for these two flags, the pattern is reduced to 1-2-1. Both flags are next to the upper 3, so we need to subtract 2 from this 3. The lower flag is also next to the lower 3, so we subtract 1 from this 3. As a result, we have (3-2)-(3-1)-1 ⇒ 1-2-1. This indicates that there are two mines: one right of the upper 3 and one right of the bottom 1. Other covered fields adjacent to the pattern do not hide any mines.


This is a simple and common situation. A 1-3-2 next to the board’s border is reduced to a 1-2-1 by a neighboring flag.


In this example, we see how a single flag can affect all three numbers changing the pattern from a 2-3-2 to a 1-2-1.


In the last example of the 1-2-1 pattern, we see three mines modifying a 2-3-3 into a 1-2-1. As a result, we find two mines and three fields that do not contain mines.
How do we know that this is correct? How do we know that the mines are in these instead of other places in all the above cases? You can figure this out by conducting logical reasoning. Let us assume that there is a mine next to the middle 2 (look at the very first vertical example for reference). But there should be two mines next to a 2. So where does the second mine go? There is a 1 above and below the middle 2, and they both already have a flagged mine. Hence, it is not possible to place a mine in the middle. Mines must share a border with the top 1 and the bottom 1. And since these are 1s and they can only have one mine touching them, all other covered fields around them do not contain mines.
There is another relatively common pattern worth learning from the start: 1-2-2-1. Similarly to 1-2-1, 1-2-2-1 can be solved using logic. However, the solution is the opposite. For 1-2-1, the solution is bomb-empty-bomb, but for 1-2-2-1, it is empty-bomb-bomb-empty. In other words, for 1-2-1, we have mines bordering on 1s, and for 1-2-2-1, we have mines bordering on 2s.
Here we see a vertical 1-2-2-1 pattern. There are two mines next to the two 2s, but other places adjacent to the pattern do not contain any mines.
Here, after considering a flag, we see a 1-2-2-1 pattern. The mines are above the two 2s, and the fields above the 1s do not contain any mines.
This is a similar situation. One flag reduces a 1-2-2-2 to a 1-2-2-1 pattern.


In the last example, we see a flag that modifies two numbers: 2-3-2-1 changes to 1-2-2-1 because the flag touches both 2 and 3.
There are many more patterns, some of them popular, some of them rare, some very useful, and some quite useless. If you want to know more about Minesweeper patterns, you can read the Patterns Guide on the Authoritative Minesweeper website or the Strategy Guide on Minesweeper Wiki.
Tips and tricks
Okay. Now you know how to use logic to solve Minesweeper. And you know some patterns so that you can play quickly. But are there any tricks to play even faster? The answer is: yes.
Question mark – switch it off. This feature was in the original Minesweeper, so it is often kept in newer versions for compatibility reasons. Still, for experienced players, it is totally useless. Right-click should plant a flag or remove it, nothing more.
Chording clicks – so far, we talked about using the left mouse button on a covered field to uncover it and using the right mouse button on a covered field to place a flag. However, there are also other possible clicks. When you left-click on a number already surrounded by the corresponding number of flags (for example a 3 with 3 flags next to it), then all the surrounding covered fields get uncovered. You can use this feature to open several covered fields with one click instead of many clicks.
Playing with the keyboard – it is also possible to play using both hands. Just place your mouse over a covered field and press Space to place/remove a flag or Enter to uncover the field. Pressing Space or Enter over a field with a number opens all adjacent covered fields if an appropriate number of flags has already been planted.
No flags – some players prefer not to place flags. This means they make fewer clicks while playing, so their speed can potentially increase. Whether this really results in faster gameplay is debatable because you need to remember those places where the mines are, and you cannot click on numbers to open multiple covered fields at once. Most advanced players sometimes place flags here and there, wherever they think it is helpful, but most of the time, they do not use flags.
Supersonic mode – some Minesweeper clones allow the player to play using only a mouse but without any clicks. How is this possible? When you hover your mouse cursor over a covered field, you automatically flag it. When you hover your mouse cursor over a field with a number, all adjacent covered fields automatically uncover, as long as the number of flags around the field matches the number inside the field. This requires the same amount of logical thinking as the regular game but makes the game much faster. The reason is that instead of clicking, you decide where to place flags and what fields to uncover just by moving your mouse across the screen. Unfortunately, this feature is unavailable in this version of Minesweeper online. However, you can find it in other clones of this game, for example at minesweeper.us.
There is one more important tip unrelated to how quickly you play but very important to remember, especially for beginner players. When you make a mistake, wrongly place a flag, and subsequently blow up a mine and lose, the game shows you your error. The incorrectly placed flag is marked with a crossed-out mine. Many people mistakenly assume that a crossed-out mine is where a mine should be. Look at the following example.
What happened here? The player correctly placed three flags along the vertical 2-3-2 sequence. These flags are still depicted as flags. However, the player subsequently placed a flag above the 2. There was no mine there (recall the 1-2-1 pattern), so the flag was set incorrectly; it is now marked with a crossed-out bomb. The bomb with a red background to the left is the field that the player uncovered and blew up because it had a mine. Many players look at such a picture and see two mines touching a 1: the bomb with a red background and the crossed-out bomb. These players think the game is broken because there are two mines next to a 1. But this is incorrect; there was only one mine next to the 1, and the game works perfectly.
Getting stuck
In traditional Minesweeper, mines are placed randomly. As a result, sometimes, there is no guarantee that you can solve the game using logic only.
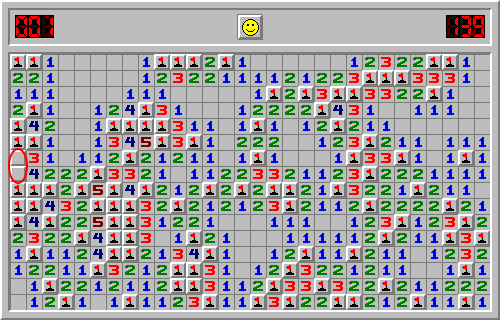
Many experienced players are too familiar with such situations, which evoke tears of frustration, recurring nightmares, or sometimes even mild cases of PTSD. In this example, after a long and exhausting play, the player almost solved a Minesweeper board on Expert difficulty within a decent time. And now they have to guess where the last mine is for the final move. Both fields, marked with a red ellipse, are equally likely to hide a mine, and thus no matter the player’s skills, the game’s outcome is reduced to a coin toss. This is particularly frustrating to less experienced players, for whom solving the Expert difficulty takes a lot of time and effort. And then, in the end, all this time and effort are often lost due to bad luck.
This may not happen, happen once, or happen multiple times during a single game. Whether you have to guess during a game is a matter of bad luck, and the larger the board is, the more frequently it happens. In Expert difficulty, a player may have to guess even four times or more. If every guess is like a coin toss (it not always is, but let us keep things simple), then the chances of solving the game are the same as the chances of getting heads four times in a row, which is less than 10%. Doubling the board size doubles the expected number of guesses. This is why large Minesweeper boards are rare. Playing them would be too frustrating as multiple guesses reduce your chances of winning practically to zero, no matter your skills.
Is there a way to fix this problem? Yes. The trouble with having to guess is present in most Minesweeper versions but not in ours. In our version of Minesweeper, you have the so-called “pure intellect” mode. When you play the game in this mode, the boards generated by the game are always deterministically solvable. It means you never have to guess where the mines are, and you can solve the game using logic only. How can it happen? Whenever a new gameboard is created, the game engine checks whether it is possible to solve this board without guessing. If it is impossible, the game changes the board, rechecks it, and the cycle continues until the game finds a board that can be solved without any guesses. “Pure intellect” mode is selected by default, so you do not have to start your adventure with Minesweeper worrying about getting stuck. Moreover, this mode is why the Superhuman and Extraterrestrial difficulties are available in our game. We also recommend the God difficulty level on minesweeper.us if you want a truly giant board.
How fast do others play?
If you are a beginner player, you may wonder what the decent times for solving each difficulty are. You may consider yourself good if you have at most 10 seconds on Beginner difficulty, 60 seconds on Intermediate, and 240 seconds on Expert. To consider yourself very good, you need 6 seconds for Beginner, 40 seconds for Intermediate, and 100 seconds for Expert.
Below are some videos in which you can see how other people play. Note that this is still a casual player level, not professional.
On Beginner difficulty:
On Intermediate difficulty:
On Expert difficulty:
On Superhuman difficulty:
On Extraterrestrial difficulty:
As far as professional players go, the World Records are as follows: 1 second on Beginner difficulty, 6 seconds on Intermediate, and 27 seconds on Expert. Specifically, as of 2022, the best times are 0.49 seconds on Beginner difficulty, 5.80 seconds on Intermediate, and 26.59 seconds on Expert.
Other resources
If you are interested in learning even more about Minesweeper, here you can find further information: